Wednesday 30 March 2011

Starting on a Chain

I'm currently making my Quatrain motif which starts on a chain.  In my instructions, I say to put a paperclip on the thread before making the first stitches.  I start first with an unflipped second half of the stitch, followed by a flipped second half of the stitch and that counts as my first stitch.  I then carried on with the first round with the paperclip left in place.  BUT, I just realised this morning that in fact, by making the unflipped stitch first, it does completely prevent the thread from sliding and closing the small space that you need a the end of the round.


So the great news is that as soon as you've made the first chain, you can remove the paperclip and carry on tatting unhindered by the clip!  I'm really pleased with that as now you don't have to keep worrying about flipping the paperclip out of the way or getting your thread tangled around it as you work.

You just must make sure that you start with an unflipped second half of the stitch, pull that tight against your paperclip and then carry on with a flipped second half of the stitch and that counts as your first double stitch.

Just thought I would let you know. 

Now back to tatting....

Best wishes,

Monday 28 March 2011

Frakira's - Take Two

I did say this medallion deserved to be remade in a plain colour, so here it is.


I adjusted the stitch count to avoid the "hat effect" in the centre round but of course, that created other problems elsewhere so I would need to add a few stitches on the second round as well.  Changing the centre also altered the overall shape of the design making it more square.  I would like to keep the initial shape so some more thought required.  I made a complete hash of the split chain to link from the first to the second round (obviously more practice needed there!).  But I do like it, and I think I may have to make another three just to see what it looks like in a repeat of four...  It would need a few extra picots for joining but I think it would be interesting in a repeat pattern.

Best wishes,

Sunday 27 March 2011

Spring Bunnies!

I just posted this at In Tatters but I'm showing it here too.  I love spring!  The leaves are just about to burst out on the trees whilst others are in bloom.  The daffodils, crocuses, Christmas rose and fritillary are now flowering and bringing long-awaited colour in our garden.  With spring comes Easter.  And my Mother-in-law loves Easter.  So when I saw this bunny border, I knew I had to make it for her.  I've not found them yet, but the border will go on some serviettes (napkins).  Not sure what colour would go best with the border so hope I can find something nice.  Or else, I could always make some...


The variegated is Lizbeth "Spring Garden" which I thought would be just right for Easter bunnies.  I'm making the rabbits ever so slightly different instead of attempting to have them look all the same, more of a free style.

The pattern can be found here.

Best wishes,

Saturday 26 March 2011

Frakira and Fox

Not long ago, Frakira (at In Tatters) posted her new pattern she had designed on a tatting course.  I really liked the overall shape of it.  So it was in my "to-do" pile of papers.  The weather has been glorious recently here in the UK and the sun is shining again today and as I was tidying my tatting threads, I saw a ball of Lizbeth "Springtime".  So I thought I had to use it today to make something and it was Frakira's design.

Now, I have to say that actually this was the wrong choice of colour for this particular design.  The colours are pretty but there is too much contrast between each colour in the thread which is distracting for the eye.  It makes it more difficult to see how nice the medallion is.  It does deserve to be remade in a plain colour instead.


And then this reminded me of another pattern I had in my "to-do" pile:  Fox's Design called "Abigail".  I realised when I looked at them that they must have been from the same design course as the starting centre is the same.  I decided to try it in two shades of purple.  As in Frakira's design, I like the fact that the four sides are not the same, makes it more interesting.  My picots are quite small compared to Fox's and I think I prefer hers.  So if I was making it again, I would go for longer picots to fill in the empty spaces a bit more.


Both designs are lovely.  My only complaint is actually about the starting round which ends up like a hat (when I make it anyway!) and then needs to be flattened with pressing.  So I would make the chains longer on that starting round.  Otherwise, two very nice medallions.  

Now I wonder what they would look like repeated...

Best wishes,

Friday 25 March 2011

Russian Squared

I persevered with the "Russian Square" as I wanted to see what it would look like in a repeat of four.
I meant to put this at the end of the last post but didn't have the picture ready as I thought I had.  So here it is.  Two posts in two days, I exaggerate really...


If I was making this again, I would adjust the stitch count slightly as it doesn't lie completely flat when I make each square.  Obviously it sorts itself out with a light pressing but I prefer tatting when there is no extra tension between the elements, where it lies flat naturally instead of having to be "forced" into it!

Best wishes,

Yet More on Hiding Ends

Following on from the finishing with a SSSR post, I've been thinking about what to do when the last ring is attached (which, more often that not, it is!) - how do you hide the ends then?  Well, instead of hiding the end coming from the chain into the first half of your SSSR, you leave it, make your ring, then use the thread from the chain to anchor your single-shuttle-split-ring.

Now I just want to say that this is just one method out of many that I use, depending on what I'm tatting, what it's going to be used for, etc.  I like to try new things but I know this won't suit some people, may not suit many people at all!  I'm just showing what I do for the sake of discussion.   I'm not telling anybody that they should do it my way, please experiment and make sure you're happy with the method if you want to use it.  Make sure it feels secure.  I just suddenly got worried that someone might blame me for their tatting falling apart!!

If you're happy with a knot and a sewing needle, there's no doubt it's a secure method of finishing your tatting!  It's just me and my aversion to sewing ends in...

Anyway, here are some photos on how to do this.  Connie was asking me about it and I have to mention that if you tat very tightly, you will find this difficult to accomplish.  It's slightly more difficult on a ring anyway as the knots tighten more than on a chain as you close the ring (particularly that last stitch which is where you want to pull back into).  So as you pull the ring closed, you have to keep those last few stitches between your fingers to make sure they don't tighten up too much or you won't be able to get the threads back through.  It took me a few goes to get this right.

Later... I just tried this again on the last piece I was making.  It is difficult with that last stitch on the ring being quite tight, yet it needs to be tight if you want your ring to be closed nice and snug and the same size as the others...  so I need to think a little further on this... it's "doable" but I need to see if there's a slightly easier way.  Will keep you posted.


26.05.11 - I've been working on this again and found a solution to that last stitch of the ring being too tight.  I put a pin (sewing pin) in the last double stitch while making it, meaning I make my last two half-stitches around the pin so that they are not so tight (remove the pin once you've closed the ring).  That makes it much easier to pull the loop back through.  I will add a picture of this as soon as possible.

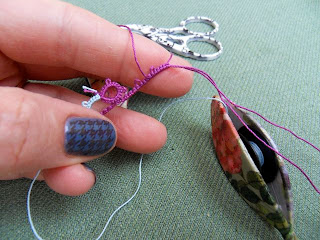
Then fold your working thread onto itself
and let the shuttle fall to the back of your
hand to start finger-tatting for the second
half ofthe split ring.
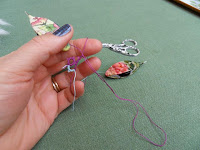
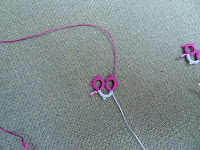
Start with making the first part of your last ring as normal.
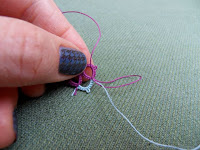
All stitches of your split ring are now completed.
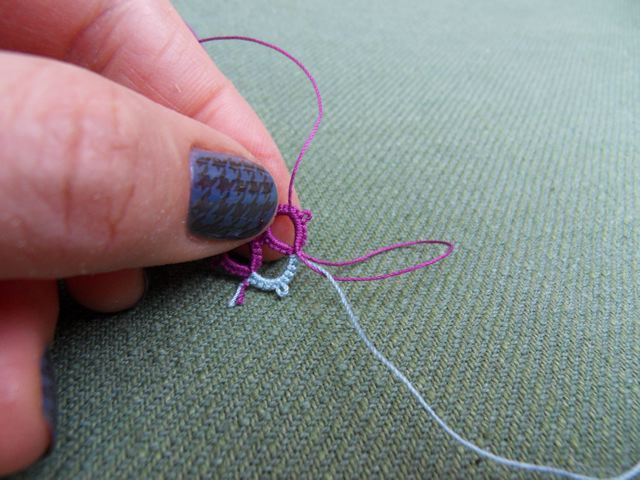
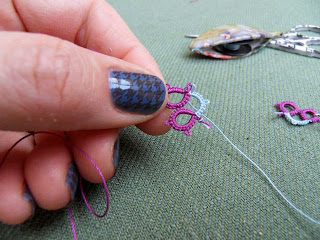
Your ring is now closed.
Cut the thread left from the chain
and pass it through the loop.  Then pull
your loop back by pulling on the
thread that is still attached to the
other shuttle.
Start closing your ring by pulling
on the appropriate side of your loop.


Continue pulling the loop back,
making sure you leave a tiny bit of slack on the thread
to be pulled back through (in this case, the blue thread).
You only want it to go back a few stitches - with
a bit of practice you will feel the thread going back
inside the stitches between your fingers and know
when to stop pulling.

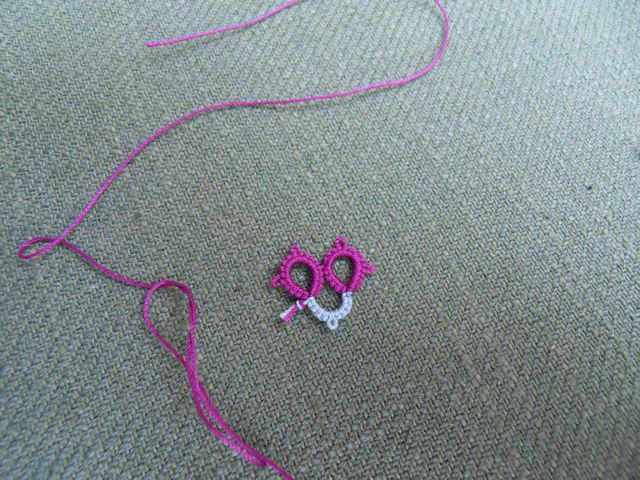
Loop pulled all the way back
and the threads are now secure
within the stitches of the ring
 with just the two thread ends left to cut.
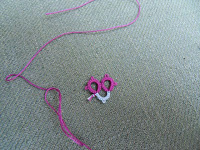
You're done!


Is it any good with the pictures right in the post like this, or is it better with the pictorial over at Flickr?

Best wishes,


Tuesday 22 March 2011

From Russia with Love

There was a thread at In Tatters about this heart repeat motif so I went to have a look at the pattern which can be found here.  It is a Russian website about tatting and I did enjoy looking through it and picked up a couple of patterns I wanted to try.  The first one being this heart pattern.  I felt the open spaces were too big (for my taste) so I sized the whole thing down and changed the stitch count slightly.  I also decided against the decorative picots (you can see them on the first heart on the left) as I felt they distracted from the shape of the heart on this small scale.  Then I played with the join where the chain reverses.  It's quite hard to make it really smooth as not only does the chain reverse there but there are two rings back to back on this join.


The second one is this square motif.  Can you tell I have a weakness for squares?  I'm undecided about it at the moment.  I might try making of repeat of four with it before I cast it away.


Added to the post later on:

As a couple of ladies have asked for my stitch count for the heart pattern, here it is:

R4-4, C6-11, R4+4, C11-6, R4+4 rw R4-4 (here I made the join by wrapping the thread around the thread that is between the two small rings so that there is pink on both sides), C6-11 and so on.  I've not put all the "RWs" in there but I think it's pretty well self-explanatory.


Best wishes,

Friday 18 March 2011

Flowery Bookmark

Here is Jane Eborall's lovely Flowery Bookmark.  I have made it for a friend and it is going in a package I am preparing today.


This pattern involves self-closing mock rings and split rings.  The first time I tried it, it was quite a challenge for me to complete it (I had never made self-closing mock rings before!).  Even this time around, I had to start twice as I made a mistake early on in the pattern.  But I really like it, particularly the way the green leaves wind their way around the flowers.

Best wishes,

Thursday 17 March 2011

Blame it on Val

Here I was happily tatting away when Val came to visit my blog... so I went to have a look at Val's... and I saw the earrings she was making.  What a great beading technique.  So I had to investigate and of course I had to try it for myself.

So here is Piattine:


So not tatting... but still needlework!  And at least I'm showing it on a background of tatting (Mary Konior's Masquerade).  

Best wishes,

Saturday 12 March 2011

Iris Handkerchief

I finished it!  Only had a few repeats left so last night I completed the tatting and then attached it to the hanky this morning.  I didn't use the crochet method for this one as the handkerchief was just too fine and I felt the crochet edging would have been too bulky and too firm a treatment in this case.  I used a fine needle and thread and an overcast stitch instead.  It really is a lovely handkerchief and the fabric is so fine it is nearly transparent.  I don't like working with white much but it seemed the best option for this pretty hanky.

The edging (my own pattern) is made in DMC Cordonnet Spécial in size 60.


Best wishes,

Thursday 10 March 2011

More Hiding Ends and Eightsome Reel

I have just finished making another pictorial for hiding ends when finishing on a chain.  See the Techniques page on top bar.  I practised this whilst making a couple of Mary Konior's Eightsome Reels.

I'm really pleased with these new methods and now don't feel so daunted at the thought of making a larger project with lots of smaller medallions - if I don't have to stop to sew ends in all the time!


Please do let me know if you find the pictorials useful.

Update (March 2015):  I have been asked for the link to this pictorial a few times which I thought had been lost (changes to Flickr where it was hosted).  Luckily someone had saved it and it is still viewable.  I am adding a caveat:  on a couple of occasions, my tatting came undone after using this method so I had initially removed it because I didn't want to be blamed if anyone tried this method and their hard work fell apart!!  So please feel free to try it and see if you feel comfortable with it and make sure you are happy your tatting is secure!


Best wishes,

Tuesday 8 March 2011

Hiding Ends

We've been having discussions on In Tatters about how to finish a piece of tatting, whether it is acceptable to just knot it and leave it or whether you should always sew the ends in.  We all came up with our different methods and I said how much I disliked having to sew ends in.  We then moved on to split rings and how to hide both ends into a single shuttle split ring.  Then Patty D. said how she does a similar thing even when ending on a chain.  So of course, I had to figure out all these methods and people were asking questions so I made a second "pictorial" to show how to hide two ends in a SSSR.


Here is a link to the pictorial:

The link will now stay in the side-bar under the "Techniques" heading.

So then I gave some thought to the problem of when the last ring is an attached ring where you can't pass the thread over the ring to anchor it as you do a normal SSSR.  And I thought of a solution.

The next pictorial will show how to do this as well.

Hope it's helpful.  I find most of the time that a picture is so much easier to understand than words.

Best wishes,

Sunday 6 March 2011

Mary Konior Strikes Again

This is patchwork by Mary Konior.


Again, like in Orsi's design, I like the chains that curve in opposite directions.  I'd like to make a design of my own eventually that incorporates that particular element.

This is another great pattern which would create a different motif once you joined four of them together.

Best wishes,

Saturday 5 March 2011

Bird Cage

This is Mary Konior's Bird Cage.  


I made myself a little diagram of her pattern so that I was able to complete the whole thing in one go.  And also so that I could avoid having the lines of bare thread that she had in her original.  She also had some cutting and joining in two places but I was able to eliminate those by using split rings.

I find it interesting that tatting seemed to have remained pretty static for hundreds of years with seemingly few new techniques being used.  Mary Konior has so many lovely designs yet she only ever used regular rings and chains.  There are so many useful techniques nowadays, split rings and chains to name but two which I use regularly.  And what about self-closing mock rings or single-shuttle split rings?

All of these new techniques seemed to have been "discovered" or "invented" relatively recently.  Am I wrong?  

Anyway I think it's wonderful that the beautiful art of tatting is doing so well and being enjoyed by so many.

Best wishes,

Friday 4 March 2011

Peacock Feather Bookmark

Found this bookmark through a link on In Tatters.  I had made several bookmarks very similar to it before... apart from the tail!  Very clever how those very long picots make it look like a peacock feather.  So of course, I had to try it.


It would be even better if I could get the colours to be symmetrical on the "feather" but I think that would be quite hard to achieve with the variegated thread.

I made the VERY long picots by winding the thread six times around a pencil before making the next double stitch.  

The pattern can be found here at Needles-n-Shuttles.

I like finishing bookmarks with a tassel but this makes a change and is very attractive.

What do you think?

Best wishes,


Wednesday 2 March 2011

Quatrain Pattern Now Available

If anyone would like to make it, my new Quatrain pattern is now available with the other patterns in the right-hand column.


If you do make it, I would welcome feedback on the pattern.

Best wishes,