Wednesday 29 May 2013

A Handkerchief for Ann

Ever since I made this edging, I had wanted to make it in different colours (not as Christmas Trees).   Then one day, a while ago, Carolyn wrote to me to say she'd used the edging for a hanky with a leaf design and it looked so pretty!  You can see her hanky here on her blog and here on Craftsy - such a nice match between the shape of the edging and the leaves on the hanky and the colours - perfect, isn't it?

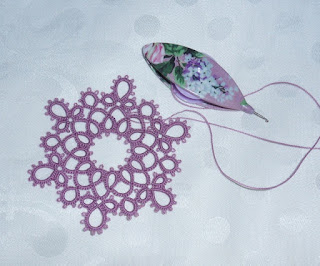
So when I was looking for an edging to make a handkerchief for a family member's special birthday, I thought I'd give it a try.  Here it is in pink:


I think white would have looked really good too...
but now I've got this far, I think I'll keep going with the pink, yes?


Best wishes,
Frivole

Tuesday 28 May 2013

Roses

I like 3D tatted roses (yes, ok, tatting is always 3D but these roses definitely have more "height" than regular tatting).  I have tried a few people's patterns, including Jeanne Lugert's rose which is really pretty and recently I purchased Toni Lansing's Rose which has a crocheted base and is made for the needle (though of course you can make it with a shuttle but the joins are a little bit more difficult to make).  I was still not completely satisfied.

So I played around with the idea.  I decided I liked the look of needle tatting for this particular flower.  The stitches are "fatter" with a needle and I felt that produced a nicer, fuller petal.  I didn't particularly want to start with a crocheted base though; I wanted it to be all tatting, all shuttle!

To get the thickness I was after, I thought of doubling the core thread.  So I start this rose with a single thickness, make the centre, then unwind the shuttle and fold the thread in two before re-winding the bobbin.  The chain-tatted petals now have a fuller look.  I like that.


These roses have sets of five petals so they end up working a bit asymmetrical but I decided I liked that.  They are not exactly the same, just like real roses would not be!


I was so pleased with them I made a pair for a friend in pink with some "danglies".


You can see on this photo some of the tatting shrapnel left over from my numerous attempts at getting this rose right.


And finally, here's a close-up
I found some sew-on crystals which matched the thread nicely.


Best wishes,
Frivole

Wednesday 22 May 2013

Tatting Video - Improved?

I can't tell you how much time I've spent trying to figure out the right way to make clear, well lit videos.  It is much more difficult to take a good video than it first appears.  I've tried all sorts of different locations in the house, different lighting, different positions for the camera...  how to attach/place the camera for filming yourself to start off is already problematic!  If it's behind you, you can't see what you're doing, if it's in front of you, it gets in the way of trying to tat, if it's attached to you, it moves too much as you make the stitches... etc.  You get the idea?

Anyway, this is not a whinge post, no, no!  It's just that I think I found a good way today.  I won't even describe the set-up to you (too Heath Robinson) but I hope you will find that the lighting is much better in this latest attempt.  I still find there is room for improvement on clarity of picture once I get to Youtube though.  I don't know where I loose quality because the video looks great straight off my camera but then I need to transfer it iMovie, then from iMovie to Youtube, you have to choose the file size and maybe I still need to work on that.  Anyway, feedback would be welcome!

I'm not sure this particular video is needed but I made one about the up vs the down join.  I wanted something short, mostly it was to try my new set-up.

Oh yes, I kept my butterfly doily in the background on this video, just for decorative purposes but of course, I would normally just have a white background.


Now I do hope I've got this up and down thingie right!  I know I had them confused before!  You put the hook DOWN, to pull the thread UP through the picot... you put your hook UP through the picot to pull the thread back DOWN through it!  So which one is which??  Anyway, I think I have it from reliable sources that you do a DOWN join on the front of the work and an UP join on the back when working FS/BS tatting.  Yes?  Except of course when you are using different colours or variegated and a DOWN join on the front would show a blip of colour, then you would use an UP...  :-))

OK, now I've got you thoroughly confused, I'll end here!

Best wishes,
Frivole

Monday 20 May 2013

Kissing Minnows

First of all, I want to thank you for all the encouraging and supportive comments on my previous post.  Your kind words always mean a lot to me.

So back to "just tatting" for a bit.  No obsessing about improving things (it's hard but I'm trying!).

I'm sure some of you saw these cute minnows on Two Shuttles's Blog?  Of course, I had to follow the link and go check the pattern out.  Isn't it fun?  I love how the lock chains make it look like little bubbles floating above the fish.

The pattern is by Antonina Caruso (Ninetta).  Worth checking out her Flickr pages, she has lots of interesting stuff on there.  Including this ingenious way of making clunies!  For those who are finding it difficult to handle the loom on the hand, this could be a solution.  The cats and little people edgings are really sweet too.

Don't you just love internet?
I do.


You can see I made a mistake and have one fish facing the wrong way.  But they would look nice facing that way too, "à la queue leu leu" as we say in French.  The Josephine Knot facing down from the chain was causing me problems - does anyone know of a good solution to make it?


On another note, I've been exchanging message with Megan who does many things as well as tatting (see her website for lots of free crochet patterns) and she told me about new information she has just put on her site and which you may find useful:  the amount of thread of different sizes needed to fill a bobbin - you know when you're winding your shuttles ctm and you're wondering how much to pull off the ball to fill the second bobbin?  Megan has worked it out and here's that information.

Best wishes,
Frivole

Thursday 16 May 2013

Losing the Flow...

I think I've been thinking about tatting too much lately (I bet you're not surprised!).  What I mean is, I've been so busy trying to make my tatting better, working front-side/back side, trying different joins, adding a half-stitch here and there to see if it looked better, posting the shuttle, not posting it... that I feel like I've lost my rhythm all of a sudden!

Tatting normally flows for me.  It's soothing, rhythmical, and effortless.  But just lately, it's not been so. I've become too obsessed with improving rather than enjoying and in fact, I think it's made my tatting worse!

That last Iris Niebach motif was awful.  And even this one below was hard work - I don't think I've ever untatted so much in one small motif!!


My proposed remedy is to go backwards a bit and just enjoy tatting as I did before, not worrying about the side or the up or down join for a bit.  Until I get "my flow" back!


This is a motif from Blomqvist and Persson's Book
"Tatting Patterns and Designs"

It is tatted in Lizbeth 20
Country Grape Lt.

But does this motif look familiar to you?  I'm sure I've tatted something very similar before... but at the moment I can't remember where it was from or when I tatted it!


I decided to decorate a couple of Aerlits for myself to give them a good try.  This one in a lovely vintage floral print went so well with the thread, I had to show you a photo:


Best wishes,
Frivole

Tuesday 14 May 2013

Time to Learn Clunies?

Last night I came upon an image on Pinterest...  after asking at In Tatters, I was told that the pattern was by Iris Niebach and it is this one, dating back from 2008.

I have to admit that I have one of Iris's small books and I don't find her patterns easy to follow (ssshhhh!  I'm embarrassed to say this!).  But this one really appealed to me so I had to tackle it.  The first stumbling block is that I hadn't tatted clunies yet (well, I had a very brief attempt at the technique some time ago which didn't conclude successfully).  So search on YouTube and Tatman came to the rescue with his video and I duly learned to make the loom, etc.

Another admission I have to make is that I am undecided about whether I like clunies in tatting.  To me, they belong to bobbin lace.  It may seem a weird thing to say but the whole technique to make them is so different to what normally goes on in tatting that it's like they're a bit alien to shuttle lace.  Is that a strange comment to make?

Nonetheless, they add an interesting texture element and I had to try them before deciding whether I like them or not!

Anyway, here is the image of my Iris Niebach motif.  THIS IS NOT MY BEST TATTING!  So don't look too closely but I was interested in just figuring out the pattern to start with and then making the clunies!  So this is my first motif ever with clunies.


As you can see, there's all sorts of clunies in there:  some are too thin, some are too fat, some look triangular rather than leaf-shaped...  The best one is middle left I think.  Still the last ones were easier to complete than the first so I'm making progress!

The other thing I found was that there was too much tension between some of the elements for me.  The "straight" lines are too wonky for my taste (due to my bad tatting!), I would need to adjust the stitch count a bit and anyway, chains are meant to curve, not lie straight so there's bound to be tension when forcing them to make a straight line.  Is that a fair comment?

Please don't think that I'm complaining about Iris's design.  It caught my eye because it's so interesting and unusual.  She does some wonderful work and I really appreciate it.  I'm just looking at it with a critical eye and wondering how I could modify it just a bit to my satisfaction.

I actually like it a lot and plan on remaking it.  I like the play of texture between the elements of the design.  It would make a really beautiful larger piece.  So I will have to make a few to see how they look like together...

Best wishes,
Frivole

Friday 10 May 2013

Thinking Ahead

I've not yet completed my current large project (the Butterfly Doily) but I'm getting itchy fingers already and started to think about what new large project I will be tackling next.

I'm not going to go round the next time.  I think I'd like a rectangle.  So it's likely it will be made from many motifs assembled together with a border.

I tatted the one below before which is from Jan Stawasz's first book.  I still like it and it may be the one!    So I'm tatting it again in different colours and threads to try to decide which to use...

I feel that I want a change from the ecru I'm currently using.  But then I quite like larger pieces to be traditional and timeless, so is cream or ecru a better option? (I'm afraid I don't like white!).  Opinions would be welcome.


I managed to make mistakes in both the samples above.  For some reason I couldn't get my head around the stitch count of the outer rings and kept putting one picot too many!  

I also feel I may have to tat this FS/BS due to the opposing rings in this design which would mean you'd have one front-side on and the other back-side facing if tatted with the traditional method.  

As there are no directions in his books, just diagrams, I'm not sure how he made the motifs himself but I didn't want to have to cut and tie between the two rounds so I used a split chain which I now feel really comfortable with since learning Marie Smith's Method.  I used to dread split chains but since learning Marie's method, they are a piece of cake!  Oh, how I love the internet and all the resources therein!  Including all the wonderful tatters who share their knowledge.

Now, of course, I have plenty of time to change my mind before I start this next large project but this one is definitely a possibility.

Best wishes,
Frivole

Wednesday 8 May 2013

Penultimate Round!

I'm getting there!  I was travelling again this weekend so the butterfly doily accompanied me.  I completed the last few repeats of the "long chains" row and have started on the "frilly split rings" row.


I do love working on larger pieces like this.  It gives me great satisfaction though I couldn't tell you exactly why.  I like feeling the weight of all that lace and seeing it draped across my lap as I work... 

Best wishes,
Frivole

Friday 3 May 2013

Update: Les P'tits Oiseaux

From the comments, the French name seemed to appeal so "Les P'tits Oiseaux" it is!  I dithered and at first called it "Les Deux Oiseaux" but I preferred the idea/image of "Les P'tits Oiseaux".  I've now finished writing up the pattern (fingers crossed, everything is accurate in it).


The green version below I made for a good friend of mine last year;  she wears it regularly and says she often gets comments on it.  


Right, I'm supposed to be tidying this morning...  Not writing more blogposts!  The sun's shining and it's another glorious spring day, time to also go put the washing on the line.  I hope the sun shines where you are too.

Best wishes,
Frivole

Thursday 2 May 2013

Kallista Necklace

I have had requests to make some of my necklace patterns available.  I had actually been thinking about it for a while so I debated with myself some more and decided that yes, I would.  The shape of this particular one reminded me of a lyre or an amphora so, inspired by the greek idea, I called it Kallista.

Here are my testers.  This is a pattern I came up with last year and I have two versions of it for sale in my shop. The pattern was only written in brief note form for myself so I had to work it a few times more and write the pattern out in more detail.  I also added a diagram.


I nearly called it something else though... because when my daughter looked at it, she said it looked like two little birds on a nest...

See what she means?  I think that's sweet.


Do you like the name?
Or should I have called it "Little Birds"?

Here is the black version of it that's currently available in my shop.

Best wishes,
Frivole