Monday 29 February 2016

First Round Completed

Just finished the first round.  Makes an interesting "fringed" hanky like that!  I've started on the second round... not sure yet if I'm happy with it.  But I shall persevere and will show you another progress photo soon.


Best wishes,
Frivole


Thursday 25 February 2016

Something a Bit Different...

Here is the start of a handkerchief edging I started working on last night.  I rather like the look even just like that... but there will be two further rounds joined to these long picots.  I can't wait to see how this works out.


Best wishes,
Frivole

Wednesday 24 February 2016

Vintage Square

I was leafing through some old tatting booklets sent to me as a gift (thank you MM!) and I saw this square.  As is frequently the case with old patterns, I found that the chains of the tatted sample were much looser than the way I like to make chains which means that the centre trefoils are quite crowded.  I would have needed to add a few extra stitches to the chains that go around that centre square of trefoils.  Also the original has trefoils on the corners after the last round (fiddly because they are added afterwards as free-standing elements) which I am not able to add as this pushes the corner in so much as to leave no space for the ring on the other side.


See what happens if I try to add the trefoils at the end?
 Although I do like the way that trefoil reshapes the chains
but you'd have to remove one of the rings to make it fit.


This square motif is from Tatting Book no. 13 by Ann Orr (sadly no date on the booklet).  Interestingly there is a paragraph in there about a "new method in tatting" which explains how to make a split ring with "reverse stitches".  The explanation says to make the first half of the ring, then take off the hand and turn over (luckily we found we don't need to do that), before making the second side with reverse stitches.  I wish there was a date in the book!

Best wishes,
Frivole

Monday 15 February 2016

I did it, I dit it! - I finished it at last!

I can't tell you how thrilled I am to have finally finish this long-standing project.  I got all the wools as a birthday present in December 2011.  So just a little over 4 years later, I finally made it to the end of knitting this beautiful jacket.  It only took so long because I do too many other things and only knitted on it here and there.  But every time I picked it up, I marvelled anew at the beautiful array of colours in this cardigan/jacket designed by Alice Starmore called "Flora", so I knew it was only a matter of time before I'd finish it and finally get the pleasure of wearing it.


I'm wearing it today.
It's so cosy and warm.

Unusually, the bands on this jacket are not made of ribbing
but of two rows of knitting followed by two rows of purling
which gives an interesting texture at the cuffs, collar
and button bands.


Aren't the colours just fabulous?

I love love love this beautiful mix!
It makes me happy just to look at it.


I wanted a "special" button to complete the jacket
which only has one button at the top.

I thought this intricate metal button fit the bill perfectly.


Yes, knitting Fair Isle with all those colours (13 in this design) and with small needles is time-consuming but there is such pleasure in watching the knitting grown and the play of colour happening row by row that I don't tire of it.  This is my fifth Fair Isle Garment and I'm sure it won't be the last.

Best wishes,
Frivole


Sunday 14 February 2016

Friday 12 February 2016

Another Pretty One

This heart is by Edda Guastalla and another one I like very much.  To my eyes, it has a very nice, "classic" heart shape.  If you fancy tatting something quicker than Susan Fuller's from the previous post, this one is smaller and quite a quick tat.  There is a little bit of tension for me around the top of the heart and the trefoil but nothing that isn't easily fixed with a slight burst of steam.  I have adjusted the chains on each side of the SCMR at the tip so that it is straighter than in Edda's original (just needs one fewer stitch on one side).

I have tatted this fs/bs
but with RODS
and not with reverse stitches
so that I could tat from the ball and not waste any precious HDT!


The thread is by NAGstudio on Etsy.  It's a very pretty mix of pastel colours, it reminds me of those sweet necklaces I use to love as a child.

Please let me know about your favourite tatted hearts.  I'd love to discover new ones I have not tatted before.  

Best wishes,
Frivole

Wednesday 10 February 2016

One of My Favourites

... is this heart design by Susan K. Fuller, called Heart's Desire.  A few years ago she kindly agreed for me to draw a diagram for her lovely pattern and post it on my blog.  You can find it under the patterns tab.

I think this heart design has a lovely shape and is really elegant.  I had not tatted it for some time so it was nice to make it again and it will be just the thing to decorate a card very soon.


Thank you for your contributions to the previous post.  Judith Connors wrote to give the history of the term "reverse stitch" which I will use from now on.  So when the stitches are flipped but done with the 2nd half first followed by the first half of the knot, they are "RODS" (reverse order double stitches) but when they are NOT flipped and the order is reversed (2nd half followed by 1st half), then they are "reverse stitches".

Anybody else tatting hearts at the moment?  Which is your favourite?

Best wishes,
Frivole

Friday 5 February 2016

Reverse Stitches?

Following on from the previous post, I'd like to have a discussion on what people call "not-flipped stitches" or unflipped stitches such as the ones you make on the second half of a split ring.  Those stitches are like a lark's head knot or also like macrame knots.  What do you call them?

Is "Reverse Stitch" the most common way of calling those stitches?  Do you like it?  In some ways I think it makes it simple:  double stitches (ds) and reverse stitches (rs) and would work well for pattern writing.  So far when I have needed such stitches in my pattern, I have explained what was needed rather than using a name.

Here are two samples that show the same piece of tatting, the first done with regular reverse work where you work the chain stitches on the back side and the second with using the method mentioned in the previous post where you do not reverse work and tat the chain stitches from the the front but unflipped, the order of these stitches is reversed when they are not flipped and you do the 2nd half of the stitch first, followed by the first half; hence I suppose, they are "reverse stitches".


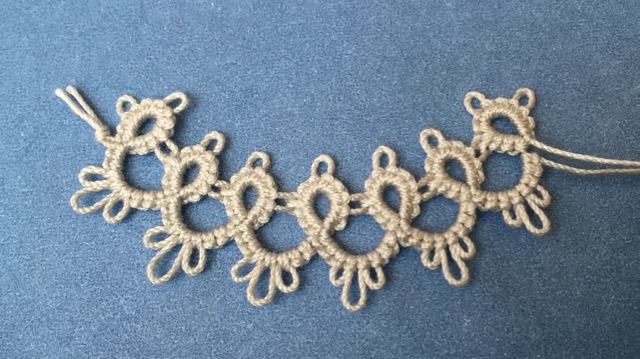
A few things strike me as I examine the photo above of a very simple row of rings and chains.  First of all, I'm always surprised by how pretty I think even really simple tatting looks!  That may seem like a silly statement but it always reminds me that you do not need to do anything fancy or know complicated techniques to produce some very pretty lace.  Don't you think?

The first three chains are tatted in the traditional way by reversing work and the last three chains are tatted from the front with reverse stitches.  The second thing that strikes me is that the curve of the chain is slightly different.  It's only very subtle but it's there.  And the third thing I noticed is that the picots when done with reverse stitches have a slightly different shape to picots done in with double stitches.  Can you see how picots in the last three chains appear closer together and a bit more elongated whereas the ones done with double stitches (first three chains) are more rounded.  

One disadvantage I can see of this method is that it always requires two shuttles whereas on a simple pattern with just plain rings and chains and the traditional method, you could work with only one shuttle and ball.

On the other hand, one big advantage is that you have automatic front-side/back-side tatting (that's if you like fs/bs tatting of course!).  I tend to find counting my stitches confusing with fs/bs tatting, but not when doing it this way.

In conclusion, I'd like to know if those stitches are to be called "reverse stitches" - is that the most commonly used term?  And what should the method be called (of doing rings with regular stitches and chains with reverse stitches)?

Thanks for any input!

Best wishes,
Frivole

Tuesday 2 February 2016

Winter Frost At Last

Not in my garden (we've had very little of it this winter in fact) but from my shuttles.  I started tatting this... before Christmas!!    But then too many things got in the way and I never got around to finishing it... until now.  I found it again and decided it was time I completed this very pretty design by Robin Perfetti called "Winter Frost".


Annoyingly I managed to miss a ring on one of the repeats!  I'm sure you can spot it (clockwise, third repeat from the top).

This pattern reminded me to talk about a technique that I regularly use when tatting short chains:  and that is NOT to reverse work and tat the chain with not-flipped stitches.  This means you always work from the front so you don't need to reverse work and have to wind back your shuttle between elements.  This makes for quicker/more efficient tatting, particularly when short chains are involved.

I made a new video illustrating this.  I have a new camera set-up and I hope that both image and especially sound are much better now.  Any feedback would be most welcome.

I still find it incredibly hard to speak without hesitating, saying the wrong thing or forgetting to say what I did mean to say!!  So yes, still much room for improvement but I'll keep working at it!


You can view this video right here, on this page, in small format
or you can either click on the "YouTube" logo
or on the "full screen" icon to see a larger version of it.


I'd love to read any comments on how you think I could improve and/or what you'd like to see in future videos.  There are already lots of videos available, do you think there are enough perhaps even??

Best wishes,
Frivole