Monday 25 December 2017

Merry Christmas!


Merry Christmas everyone!  

I hope you are all enjoying a wonderful day with your loved ones.


We don't get around to it every year but we do like making a gingerbread house for Christmas.  This recipe is my favourite gingerbread, it really tastes great.  This year, our eldest took over and the house became a more elaborate castle with port-culiss, ivy on the walls, and even a well (which unfortunately you can't quite see in the photo).


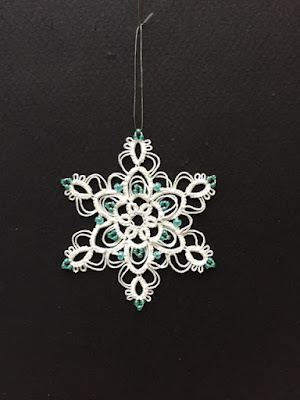
Our tree with lots of tatted snowflakes.


And two more pairs of felted slippers which ended up under the tree...


Very best wishes for a great 2018!

Frivole

Monday 18 December 2017

Holidays!

Time is flying!  Seems like ages since I last posted.  I've been away to visit my family which was wonderful.  I'm now back but it's so close to Christmas and so much to do!  I'm sure many of you feel the same.

I've not been tatting much after the flurry of Qaniks.  I have been giving them away to friends and family to put on their trees.

Instead I've been knitting presents!

I made two pairs of socks for my father and then whilst home, discovered this great pattern for knitted felted slippers.  I just had to give them a try.  They have a great shape and are so comfortable to wear.  A real winner!

This was my first pair, to see how they worked out.
I had to have three goes at the washing/felting process
before they came out right.


On this photo you can see what it looks like before felting:


I just finished a pair for my Mum
which have gone in the post this afternoon.
She said she liked burnt orange and grey.
I added some decorative buttons.


I'm quite behind with everything (that's what happens when you go away at the beginning of December!) so tonight is Christmas pudding making... and more knitting!

I hope you are all enjoying the build-up to the festivities but also having time to relax and spend time with friends and family.

Very best wishes,
Frivole

Saturday 25 November 2017

Dog & Sunflowers

A bit of crochet fun for this post.  These are the things I've been working on lately.  It was a nice change from tatting so many versions of Qanik!

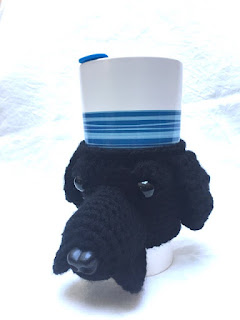
Do you remember the Dachshund?  I helped a friend who wanted a Black Labrador version.  Here it is.


He's a bit hard to photograph as he's so dark!


And I've also made some sunflowers for my daughter.  They're coasters.  I know young people don't need/use coasters, do they?, but my daughter really likes sunflowers so I thought she'd like them for her room.


Best wishes,
Frivole

Sunday 19 November 2017

Qanik... and the generator says?

7, 13, 21, 11,  and 22.  That's the order in which the numbers came out and they are:  Sillystring, Joschaocchi, Jenn, Margaret and Bernice.  Please kindly send me your email using the link on the right column ("Contact Frivole") and I'll send you the pattern.

Added 20.11.17:  I decided to draw one more name as Joschaocchi (one of the winners) had been one of my testers so she already had the pattern.  Number 10 came up, that's Janemactats (pattern already sent!).


I really fiddled a lot with this pattern, making very small changes right up until today.  But that's it now.  I'm sending it out so this is the final version.

I must admit it's not that easy to get the long chains perfectly even.   It is so easy to pull them just a bit tighter or looser and they really need to be as much the same length as possible.  Still, even with a bit of unevenness, I hope you'll still enjoy how it looks and enjoy making it.    I also ended up adding picots in the very centre and I think that marries better with the look of the picots on the arms and between them.

Getting chains the same length is one reason why I like tatting them with unflipped stitches:  when I tat this way, I pull each stitch as I make it but I do not snug the chain at the end (like I do when I tat chains with normal, flipped stitches).  I find this makes my stitches, and my chains, more even.

During tatting, the points end up leaning a bit and I find this design and its long chains benefits from blocking to get it looking its best.

I've made so many samples of Qanik now that I have plenty to gift in my Christmas cards to friends and family.  I think I'm happy to move on to the next project.


Best wishes,
Frivole

Wednesday 15 November 2017

Snowflakes

It's nice to re-visit patterns.  I've been making my way through my pattern book and hope to make some more.  I also spotted little amendments to make so will upload updated versions of patterns where necessary.

This is Céleste with "unarranged" picots
in silver thread and light teal and silver beads
I quite like that slightly messy look.


 Here it is again where I've played with the long picots a little bit
although I realised when I got to the end that I'd forgotten to make one!
Can you spot where?


This is Snowdrop


And lastly I made Twinkle Twinkle with pointy chains
to see how that would look
and I also made my latest snowflake with shorter arms
again, just to see!


Oh, and I got a name for it now!


I called it Qanik
It's the word for "falling snow" in Inuktitut
one of the Inuit languages


I think I will have a little draw... what do you think?
I will pick 5 names at random from comments to this post
to win a copy of Qanik.
... that's if you fancy making it of course!

Draw to be made very soon!


Are you guys busy making snowflakes too?  It's that time of year, isn't it.

Best wishes,
Frivole

Saturday 11 November 2017

Manly Socks?

Finished this pair of tomato red socks for a man in my family.  I hope the nice fine braiding is manly enough?  I wish I could have made the leg just a bit longer but I'd run out of wool and it didn't seem worth buying a whole other skein just for an inch or two on the leg.


I'm still enjoying knitting socks at the moment.
I have another pair on my needles already.

Best wishes,
Frivole

Friday 3 November 2017

Beaded Twinkle and Updated Pattern

Two posts in one day!  But I wanted to let you know that I've now updated the pattern, still available from the same link.  It just shows how easy it is to make modifications and slightly change the look of a pattern with just a few stitches here and there.


Next I thought why not add a few beads...


And a last one in gold,
since it's a star
(real stars aren't gold though, are they?)

I added another stitch to the outer chains on that last one
so that there would be a bit more space around the beaded picots.
It now looks completely different from the original design...
still basically the same thing though!


I think I'll make a few more so I have extra to give away
when comes time to write my Christmas cards.

Best wishes,
Frivole

Twinkle Twinkle Re-visited

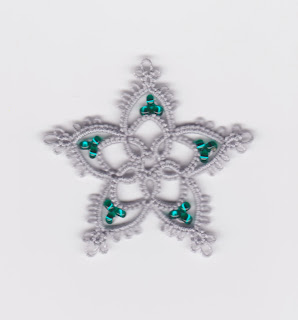
It's always good to go back and tat some of one's old patterns.  This one is a free one I wrote in 2013 (available in the "Patterns" section, tab above).


The smallest one on the left is tatted exactly as per the pattern.  I wasn't sure if I liked how the chains from the first round made nearly a circle around the centre ring.  I thought I'd prefer them to be a bit more pointy, like the outer chains...  So I added a few stitches... and then a couple more...

And now it looks like this:

What do you think?  Maybe I should just provide both versions on the pattern and people can choose?


Actually, looking at them again, the first original one looks a bit like those stars you trace in one go without lifting your pen, you know, where the lines cross in the middle?  I think adding those few stitches makes them look quite different.

Doing the ring at the tip as a SCMR gives that nice pointy shape to the chains.  If you were to make a normal thrown ring, the chain would be rounded.

This little star is very quick to make... I love sending people snowflakes in their Christmas cards... if you're short on time, you could make this one!  :-)

I'll try to update the pattern shortly.

Best wishes,
Frivole

Wednesday 25 October 2017

YESSSSSS! Green Doily Finished!

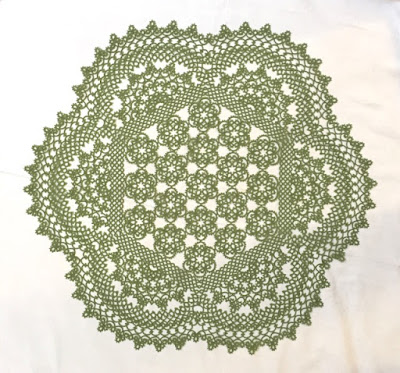
I'm so pleased to have completed this one.  I have liked it and planned to make it for several years before I finally decided to tackle it.  I do like Jan Stawasz's designs very much and this one is no exception.


I like the hexagon shape in the centre and I love the scallops.
Visually, I also like the contrast in textures.


I tatted this in DMC Babylo size 20 thread.  
It comes in 50g balls and I only needed a whole one and part of another
(the doily only weighs 71g - surprising isn't it?).  
It measures 23in (58cm) across.


Working on this large piece inspired me to try new things to be more efficient like making rings as SCMRs so that I didn't need to refill my shuttle and used thread from the ball and making chains unflipped so that I don't have to keep reversing work and rewinding my shuttle.  The latter technique I have adopted permanently as I really like it, find it more efficient and I like working from the front all the time.


Best wishes,
Frivole

Friday 20 October 2017

Bejewelled Ice Drop

I met with a tatting friend yesterday.  She is a member of the Ice Drop Addict group.  She had lots of pretty ice drops to show me.  I particularly liked this one with bugle beads and Swarovski crystals.  My friend was kind enough to give me all the bits to make one.  She is not very experienced with posting images on the internet so has not yet been able to share her creation on the Ice Drop Addict Facebook page (just in case Diane wonders why she's not seen it there yet!).


The pattern is a slight modification of Nicola Bowersox's Birthday Ice Drop (which was itself adapted from Wally Sosa's 2015 Birthday Motif pattern).  


Very pretty I think.
A nice use of bugle beads,
and I also like the addition of Swarovkis.

I might just have to make another as she also gave me some blue cabochons...
*** Thank you! ***

It was a nice break from the pattern from the previous post which, believe or not, I'm still working on!  I might get to the end eventually.

Best wishes,
Frivole

Saturday 7 October 2017

Several More Samples Later...

Oh, you can keep fiddling forever!  But I think I'm happy with this most recent version.  I needed to space the centre rings more as there was some tension in the design but then I felt the circle right at the centre ended up too big so I decided to fill it.  Yes, I think I prefer that.  I lengthened the arms by a couple of stitches.  I also found that starting on a ring on a point enabled me to tat the whole thing in one pass without that awkward split ring I had in the previous post.  I added a few extra picots (I may change those a bit again)... to make it look more frosty!  I also added a bit more space between the chains as I thought it made it look a bit "heavy" when the two chains touched.  which lightens up the design.

Here are most of the samples I tatted pinned to my board.  I like to look at them as I work and let them speak to me as to how I should proceed!  :-)  Viewing designs from a distance also gives you a different perspective; it lets you see the overall shape, rather than the detail, and the play of positive versus negative space in the motif which helps me decide what modification to try next.


I hope I can come to a definitive version soon!

Best wishes,
Frivole
Wednesday 27 September 2017

About Josephine Knots...

I've been making lots of Josephine knots as I was working on this new pattern.  I wasn't happy with the way they were lying...  I really wanted a perfectly round shape that sat neatly on top of the chain.

So I tried different things:

I'm posting this image really big so you can see all the detail.  From left to right, here is what I did:

1. Josephine Knot done with the first half of a double stitch (10 halves). When I was first making JKs, I used the first half of the double stitch repeated.  For some reason it took me ages to try it with the second half instead!  Anyway, the first half is much more difficult to work with, causing lots of twisting and making it difficult to achieve a nice looking, regular JK.  So second half is definitely the way to go (I bet you knew that already!).  But just to show you, the first JK is done with first halves.

2. Josephine Knot done with the second half of a double stitch (10 halves).  A much smoother, rounder looking JK.  But the last half stitch twists towards the back too much I find and it appears to lean left.

3. JK done with second half of the double stitch but adding a full stitch at the beginning and at the end (1ds, 8 halves, 1 ds).  Yes, that's better.

4. KJ done with second half of the double stitch and just an extra first half of a double stitch added at the end (10 second halves + 1 first half).  Trying to prevent twisting again but that didn't do the trick.

5 and 6. JK done with second half of the double stitch but before closing the ring, pass your shuttle through the ring from front to back. Yes, that did it.  Passing the shuttle through from front to back means that the thread now exits the back of your ring so the next stitches pull slightly on the thread and help bring the stitches in line for a much more round and full looking JK. 

I'm happy with those last two versions and that's the way I'll be making my JKs in future.  Here is the new pattern I'm working on with lots of JKs!  It's evolved quite a bit from the very first version but I felt the centre was too crowded and the whole thing was quite tight with three rounds so I opened up the centre and changed the second round a bit.  Any good?  Criticism welcome!


I'm still giving it some thought, trying to get spacing between the chains more even, I'm adjusting that on the next sample.  I'm also not too happy with the split ring I used to make this a one pass design.  It ends up having a strange shape and I wish I could find a better way.  I really don't want to cut and tie and make this two rounds.  Can I live with a slightly strange shaped small ring?  I don't know.  I'm sure you can spot which one it is?  It's the one to the left of the top point.  Oh!  I got it!  I was just re-reading myself before publishing this blogpost and looking at the photo above, I just found where I need to start so that I won't have the problem of the misshapen ring.  Quick, I'll tat the next sample and post again.  


The photo below shows some of the gradual evolution:


Best wishes,
Frivole

Friday 22 September 2017

Earrings and New Snowflake?

I'd forgotten how much I like these layered flowers.  I made several at some point and then forgot about the pattern.  I wanted to make some new earrings for my daughter so I made her a pair in green:


Idea from Edwige Renaudin's Book "La Frivolité aux Navettes"


I might change the size of the rings slightly on the next pair as there are three rows but the middle row is lost a bit so I'll try adjusting the number of stitches just a bit.

And I found a snowflake design I'd been working on a while back and which I never finished to my satisfaction.  I decided to have another stab at it.  I think the shape is interesting but it's still not quite right... and I want to find a way of working it continuously, in one pass.  At the moment, I can't link the 2nd to the 3rd round without a break.  I'll keep working at it.


Best wishes,
Frivole

Sunday 17 September 2017

A Bit More Giant Tatting, Needle Lace, and Gifts from the Garden

I had another go with a different yarn.  The blue one from the previous post was a cotton yarn where the strands were quite loose and it was easy to catch the strands with the hook when trying to close the rings.  This time I used a thick wool yarn in aran weight and a 5mm crochet hook and it was much easier to work.


You can't see in the photo but I actually drilled a hole in the bottom of my hook (pictured in photo) so that I could use it like a tatting needle and thread my yarn through it at the bottom.  I tried like that and I tried the cro-tatting way but I preferred the look at the bottom of the rings when made the cro-tatting way and then there is also the great advantage of working from the ball too.  Except I've not yet figured out how to make "tatted" chains that way so the chains are actually crocheted.  You can see how large this tatting is compared with the tatted leaf in the middle which is made in size 20 thread.

Anyway, I don't know if I'm going anywhere with this.  Perhaps that's it for now and it was just interesting to try very large tatting.  I think it could be interesting to tat a shawl or something like that but I'd have to practice some more to get more even rings because at the moment, it's not satisfactory to me!

Then I saw a video on YouTube that caught my eye and I had to give something new a try.  It's a bit of needle lace...

The bottom motif is my first attempt (rather wonky!) and the green one is my second attempt (already much better).  It was interesting to make and it looks pretty.  Some of the edgings I've seen done with this technique are really lovely.


And lastly, just a photo from my garden.  We had a go at growing a few vegetables this summer with very mixed results.  Tomatoes and green beans were a bit of a disaster but this weekend we dug up some potatoes and beetroot which are very nice, a few stunted ears of corn (not a huge success) and we also collected the remainder of the apples from our trees (we have two).  The photo shows some of what we collected and I just thought the fruit and veg looked appealing in the sunshine...


Best wishes,
Frivole

Thursday 14 September 2017

Giant Tatting, Miniature Knitting and More Socks

Just been having a bit of fun with a few things lately.  A friend of mine showed me some amazing miniature sweaters so I gave tiny knitting a try with some pins and tatting cotton.  It's not difficult to knit in that size really, the only thing that's difficult is finding a way of holding on to the needles!  What you'd need is a needle that is fine but much longer so you could grasp it.  After that I saw some big tatting somewhere and went on the search for a set of japanese crochet-tatting needles I'd got a few years ago and which were gathering dust in a drawer.

I added the tatting shuttle in there to give you an idea of scale.  As you can see my cro-tatting skills are still leaving much to be desired!


Blowing the next image up so you can see how small the knitting is!


I'm still finding it really hard to make a neat job of needle tatting though not doubt it's just a matter of practice.  I kind of like the idea of oversized tatting though and I think (if I can get my technique up to scratch) it could be nice to make a bold necklace in a thicker yarn.  I might give it another try.  

And then I also have more socks on my needles which will be gifts.  A pair of fun, extremely fluffy ones with cookie monster eyes for a young person:


And another pair in my current favourite sock yarn (Cascade Heritage) with nice fine cabling, a pattern by Wendy Johnson.


That's it for now.  Tonight I'm working on the green doily.  I'm over a third of the way around the last round so just more of what you've already seen.  That's the problem with big projects isn't it.  You feel like you don't have anything new to show for a while.


Autumn is definitely in the air already.  It's been cool, wet and windy!

Best wishes,
Frivole

Saturday 2 September 2017

Basket Case!

We did have some fun with our basket making!  I'm back now but was a bit sorry to have to leave my unfinished last project behind... for the next holiday.  I'm definitely keen to make some more baskets at some point (and even try some different kinds).  These coiled baskets are really easy though and anyone could have a go at making them.  They are inexpensive as you don't need to buy any materials (apart from some string maybe but any cheap natural fibre string would work - well, it doesn't even need to be natural fibre of course, but I just think it's nicer to go with the dry grass and the whole theme of it.).

After the first larger basket, I decided I wanted to make one with a lid.  This time I used a different, finer linen string to make it.


I decorated the lid with real acorns and some crochet oak leaves.
I loved the tiny one I found which I drilled
with a fine drill bit so I could attach it.


After the lidded one, I decided to try using raffia as my 
tying/covering media and completely covered the dry grass.
I looks really nice and makes for a more "professional" looking basket
which is smooth and tight.

The only thing with rafia is that the lengths are shorter
so you need to refill your needle and join more often.
Raffia is a natural fibre which is also inexpensive.
It's really thin but really strong.
I had never worked with raffia before and I like it.


I asked my son to make me yet another needle for this project,
one that was flatter to be more easily inserted between the tight coils.

He made it out of elder (the others were all made of oak) and it works
a treat.  Sadly it eventually broke but he promised to make me another one.


Here are the various needles he made for us:


And lastly, a photo of our collective first effort
at basket making - there are even more unfinished items
that I didn't show in the photo.


I made a couple of videos on this which I will upload over the course of the next couple of weeks.  I really enjoyed this holiday activity with my children.

I hope you all had a nice time too.  Can't believe it's September already!  Time to buy new school shoes and get back to the routine.  

Best wishes,
Frivole